“Varient - News & Magazine Script” Documentation by “Codingest” v1.3.2
“Varient - News & Magazine Script”
Created: 17.11.2017
By: Codingest
Email: codingest@gmail.com
Thank you for purchasing my script. If you have any questions that are beyond the scope of this help file, please feel free to email via my user page contact form here. Thanks so much!
Table of Contents
- Introduction
- Files
- Install
- Image Upload Settings
- Quick Start
- Admin Panel
- Navigation
- Pages
- Posts
- Scheduled Posts
- Drafts
- RSS Feeds
- Categories
- Widgets
- Polls
- Gallery
- Contact Messages
- Comments
- Newsletter
- Ad Spaces
- Users
- Update Profile
- Font Options
- Seo Tools
- Social Login Configuration
- Preferences
- Forgot Password
- Visual Settings
- Settings
- Author Panel
1) Introduction - top
Varient is a multi-purpose news & magazine script. It has clean, responsive and user-friendly desing. You can manage almost everything in your site with its powerful Admin panel. It is multi-author system and all authors have their own panel to manage their posts, videos and audios. It is secured, seo optimized, fast and easy to use.
Technologies used:- PHP CodeIgniter
- HTML 5
- CSS 3 (Bootstrap)
- JQUERY
- AJAX
- Clean and Responsive Design
- Built Using Bootstrap
- Totally Secure System
- Seo Optimized
- SEO-Friendly URL
- Multiple Language Support (English, German, French, Turkish, Portuguese, Russian, Italian, Spanish)
- 10 Layout Colors
- Editable & Sortable Navigation (With mega menu)
- External Link & Dropdown Options for Navigation
- Responsive & Sortable Slider
- Responsive Ad Spaces for Any Kind of Ad Codes (Including Adsense)
- Create Ad Codes
- Adding Unlimited Fully Editable Pages
- Show & Hide Options for Page, Page Title, Page Breadcrumb, Page Right Column
- Gallery Page (Enable & Disable Option)
- Gallery Categories
- Contact Page (With Google Map)
- Search in Site
- Reading List Page (Add & Remove from List)
- Featured Posts
- RSS Importer System (Auto Update with Cron Job)
- News Ticker
- Add, Delete, Update Posts
- Video Post Option
- Audio Post Option(With Playlist)
- Schedule Posts
- Save as Draft Option for Posts
- Add Multiple Images to a Post.
- Add, Delete, Update Categories
- Add, Delete Photos
- Add & Remove Posts from Slider
- Newsletter (Send Html Email to All Registered Emails)
- Manage Registered Emails
- Lazy Image Loading
- Dynamic Tag System
- Ajax Comment System
- Facebook Comments
- Voting Poll (Add, Delete Unlimited Poll)
- Social Login (Facebook & Google)
- Social Sharing
- Social Media Links
- Sidebar Widgets (Add, Delete, Update widgets)
- Widget: Popular Posts
- Widget: Recommended Posts
- Widget: Random Posts Slider
- Widget: Tags
- Widget: Voting Poll
- Pageview Counts (Enable & Disable Option)
- Manage Comments
- Manage Contact Messages
- Advanced Post Options
- Sitemap.xml Generator
- RSS (With different channels)
- 30 Font Options
- Rich Text Editor (Image and Video Can Be Added)
- Membership System with 3 Roles (Admin, Author, User)
- Manage Registered Users
- Ban User Accounts
- Change User Role
- Admin & Author Profile Page
- Enable & Disable Membership System
- Enable & Disable Comment System
- Secure Authentication
- Password Reset
- Google Analytics
- Google Analytics
- Advanced Settings Options
- Visual Settings
- Change Logo, Favicon, Site Title, Site Description, etc. from Admin Panel
- Easy Installation Using Installation Wizard
- Detailed Documentation
- Runs on PHP 5.5+ (and PHP 7)
Security:
Varient is a secure system. There are various mechanisms to secure application. These mechanisms are:
- Cross-Site Request Forgery (CSRF) Prevention
- Cross-Site Scripting (XSS) Prevention
- Password Hashing
- Avoiding SQL Injection
Requirements:
There are some requirements for Varient to work on your server. These requirements are:
- PHP >= 5.5+ (and PHP 7)
2) Files - top
a) CSS Files- AdminLTE.min.css and _all-skins.min.css: Contains general css codes for admin panel.
- bootstrap-toggle.min.css: Contains bootstrap toggle css codes.
- custom.css: Contains css fixes for admin panel.
- style.css: Contains main css codes.
- responsive.css: Contains reponsive css fixes.
- colors css files: Contains color options.
-
Style.css file is separated into sections using:
/* ============ 1. General layout CSS styles ============ */
code
/* ============ 2. Header ============ */
code
/* ============ 3. Slider ============ */
code
etc, etc.
- jquery-1.12.4.min.js: Javascript library
- app.min.js: This file contains general dashboard script codes.
- bootstrap-toggle.min.js: Contains bootstrap toggle javascript codes.
- custom.js: Contains custom script codes. There are custom functions and ajax post functions
- jquery.cookie.js: JavaScript library for handling cookies
- script.js: Contains javascript functions for front-end.
Js files are separated into sections using:
//ajax post delete image
code
//datatable function
code
etc, etc.
-
jQuery
jQuery is a Javascript library that greatly reduces the amount of code that you must write. -
jQueryUI
jQuery UI is a curated set of user interface interactions, effects, widgets, and themes built on top of the jQuery JavaScript Library. -
Ckeditor
CKEditor is a browser-based WYSIWYG content editor. -
Datatables
DataTables is a plug-in for the jQuery Javascript library. It is a highly flexible tool, based upon the foundations of progressive enhancement, and will add
advanced interaction controls to any HTML table. -
ICheck
Highly customizable checkboxes and radio buttons. -
Pace
Automatic page load progress bar. -
Tagsinput
jQuery plugin providing a Twitter Bootstrap user interface for managing tags -
News Ticker
Jquery news ticker plugin -
Magnific Popup
Jquery Gallery plugin -
Owl-Carousel
Responsive jquery slider plugin -
Jquery-confirm
Jquery-confirm plugin -
Masonry-filter
Jquery gallery plugin
3) Install - top
To Install Varient:
Note: Please check your PHP version before installing. In order for Varient to work properly, your PHP
version should be at least 5.5. We recommend PHP 5.6 or PHP 7.0.
Note: cURL PHP extension should be enabled in your server. If you get this error during installation
"cURL is not available on your server! Please enable cURL to continue the installation.", you should enable cURL on your server.
You can enable it by adding "extension=php_curl.dll" this line to your php.ini file. If you can not access your php.ini file please contact with your host service.
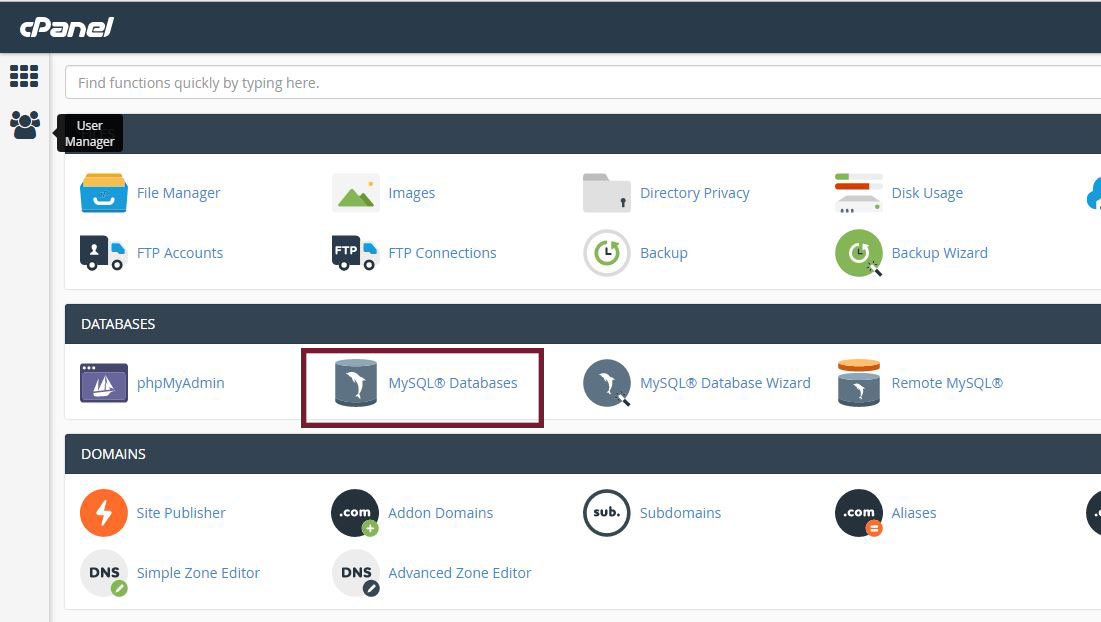
- Go to Cpanel and Click MySQL® Databases
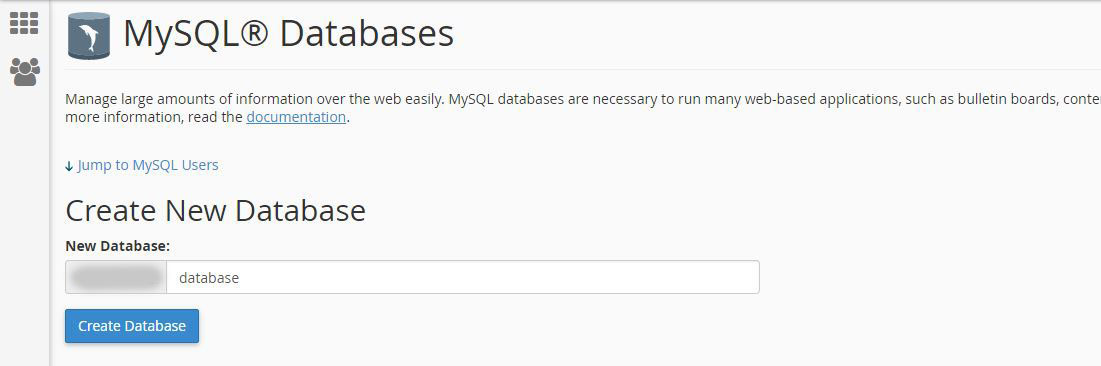
- Create New Database
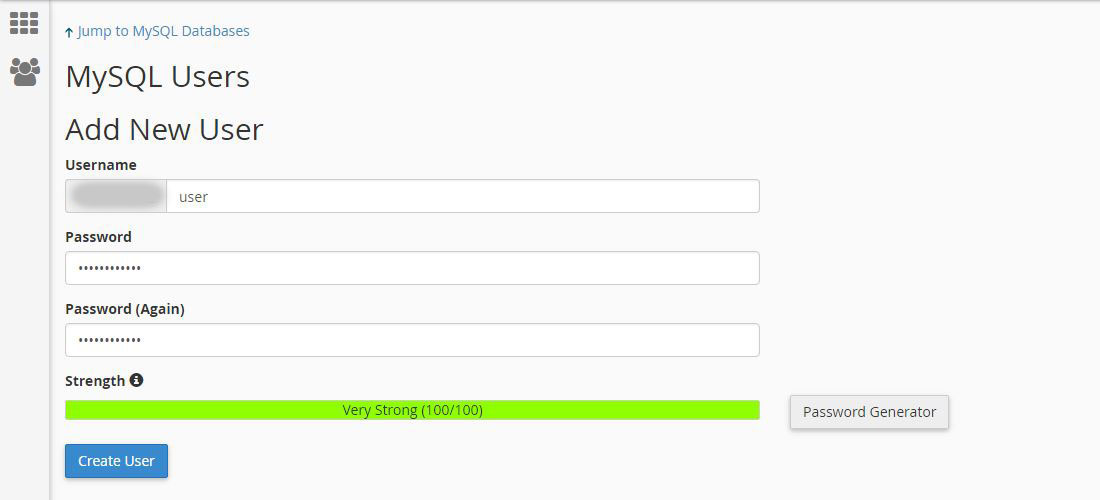
- Add New User
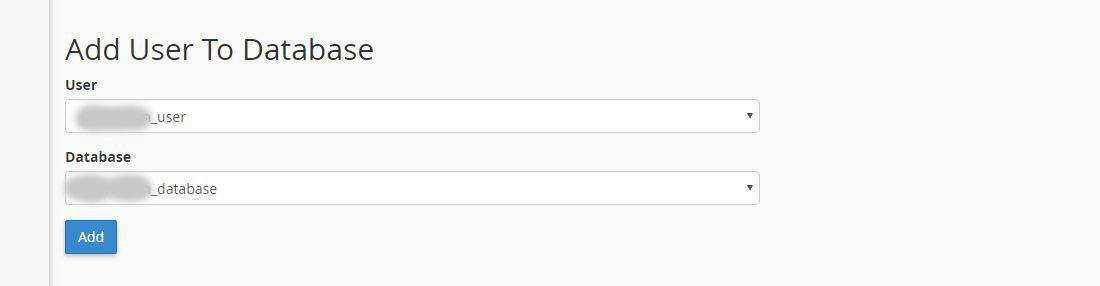
- Add User To Database
- Set User Permissions
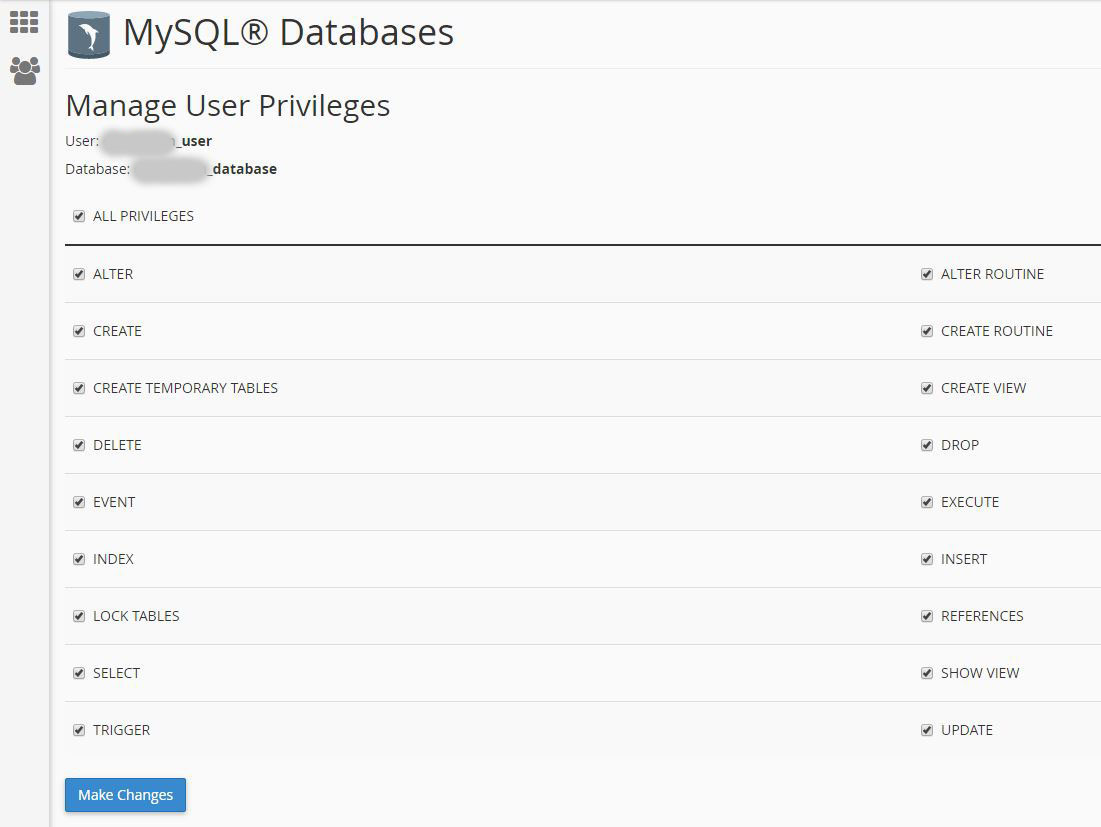
3. Run the Install file. (http://yourdomain.com/install)
4. Follow Steps in Installation Instructions.
-
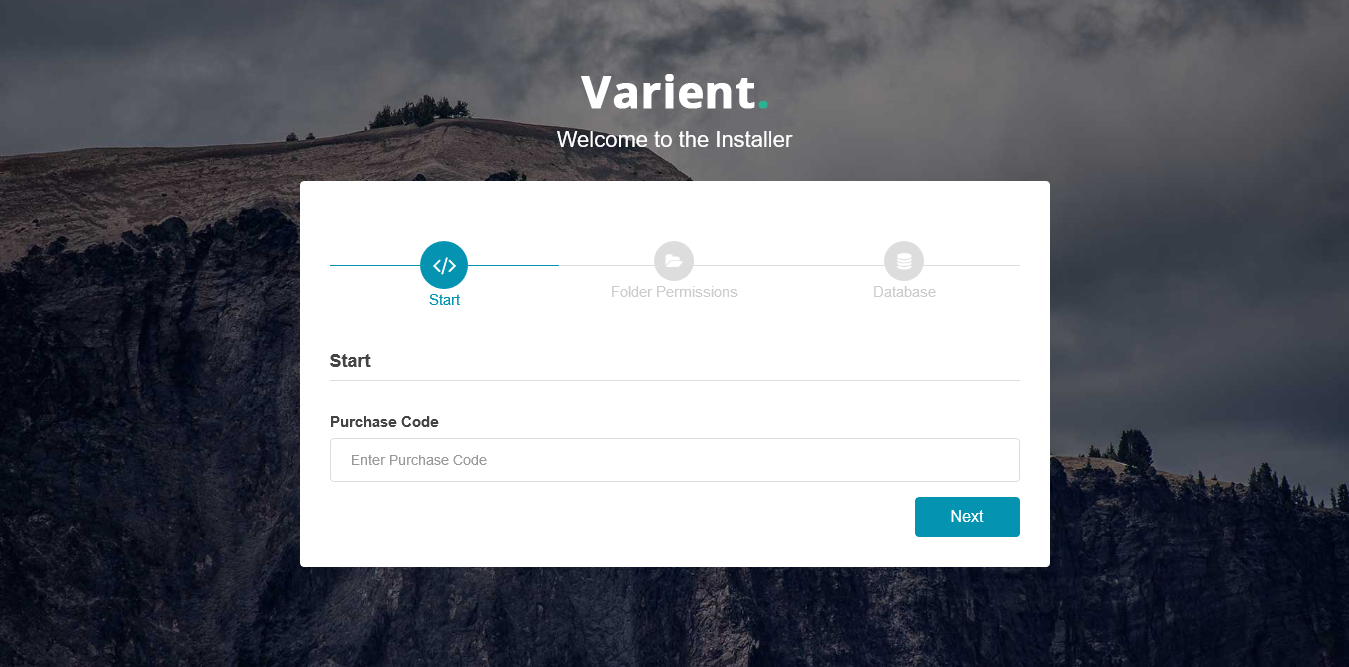
Enter your purchase code. Then click Next.
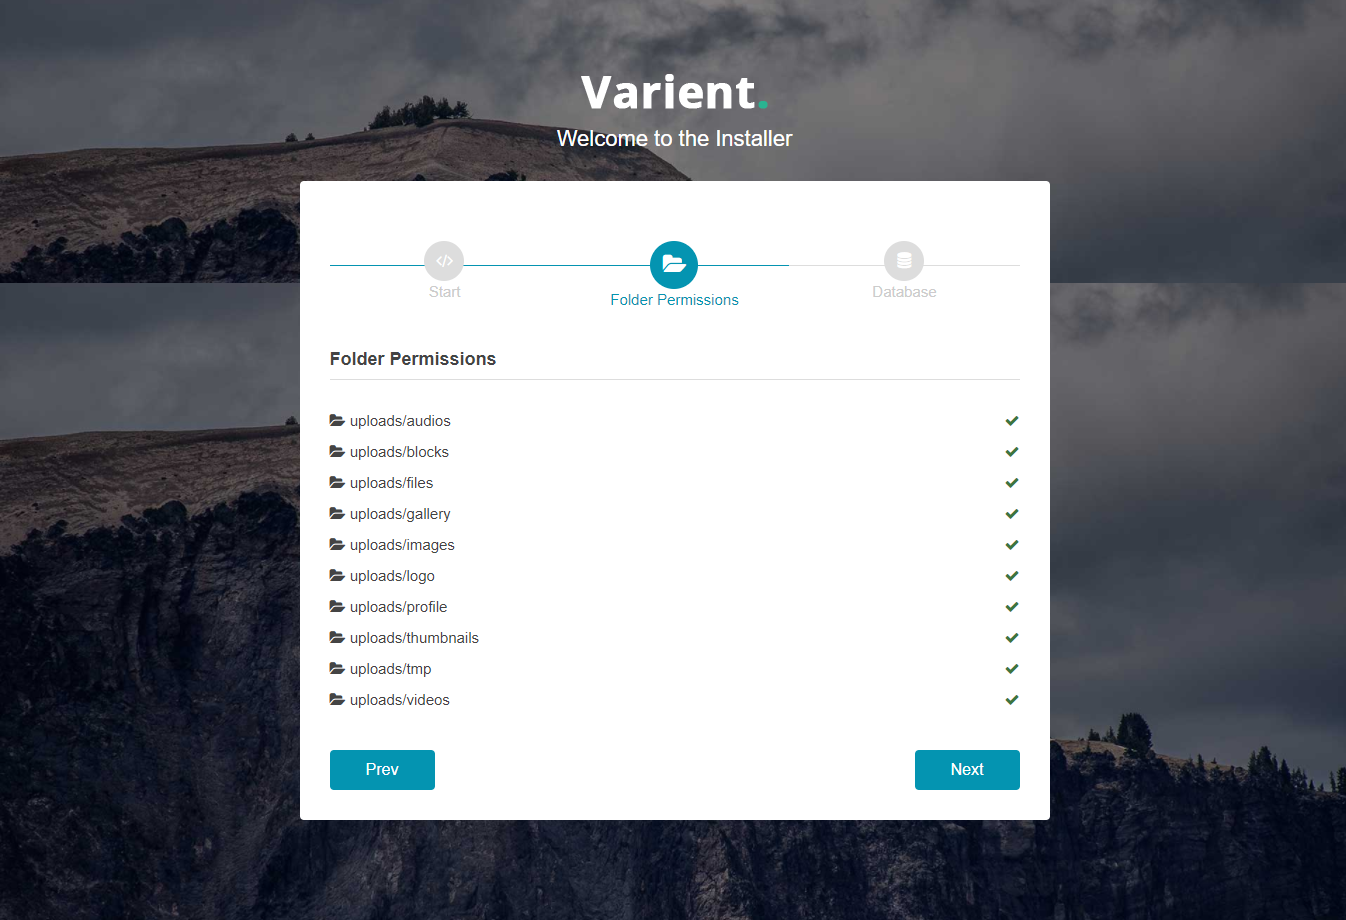
- Check your folder permissions. If all folders are writable, click Next
-
Enter your database credentials. Then click Install.
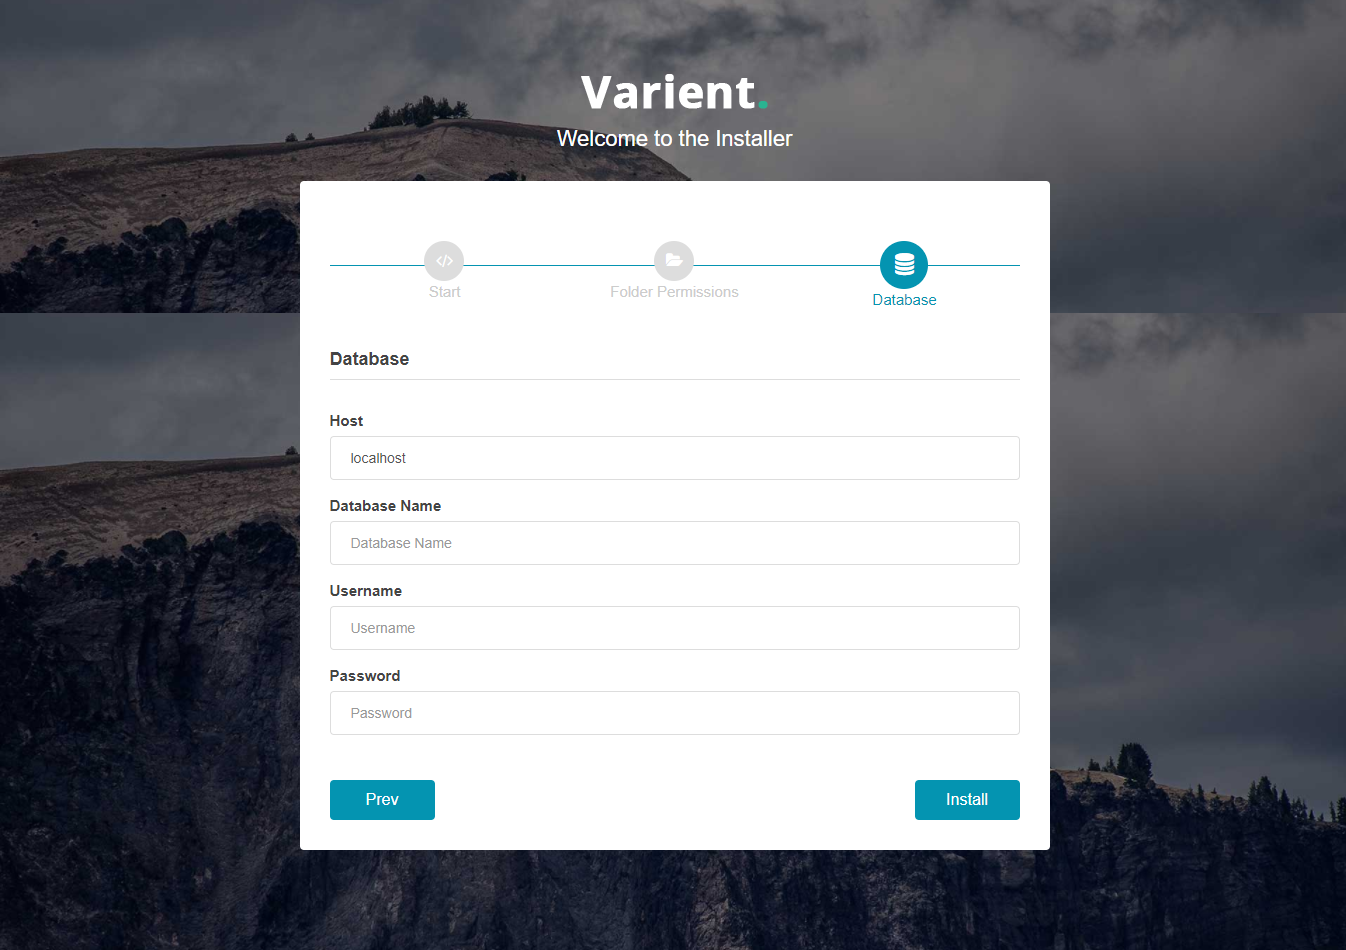
***Note: If you want to change your database credentials later, you can edit the database.php file in the application>config folder.
5. Delete the install folder on the main directory.
After installation default admin account is:
Email: admin@gmail.com
Password: 1234
4) Image Upload Settings - top
Varient performs image optimization while uploading. This optimization consumes memory.
If you try to upload large images without doing some settings on your server, you can get an error.
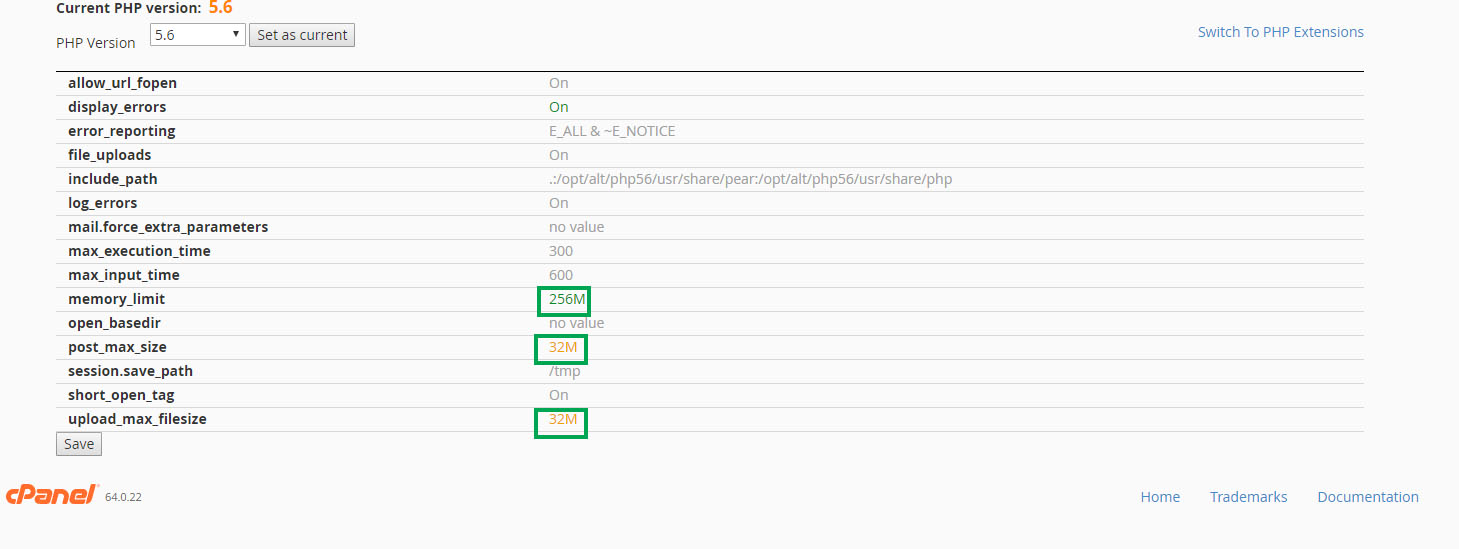
If you can't upload large images, you need to set these values. These are recommended minimum values.
php_value upload_max_filesize 32M
php_value post_max_size 32M
php_value memory_limit 256M
To set these values follow the steps:
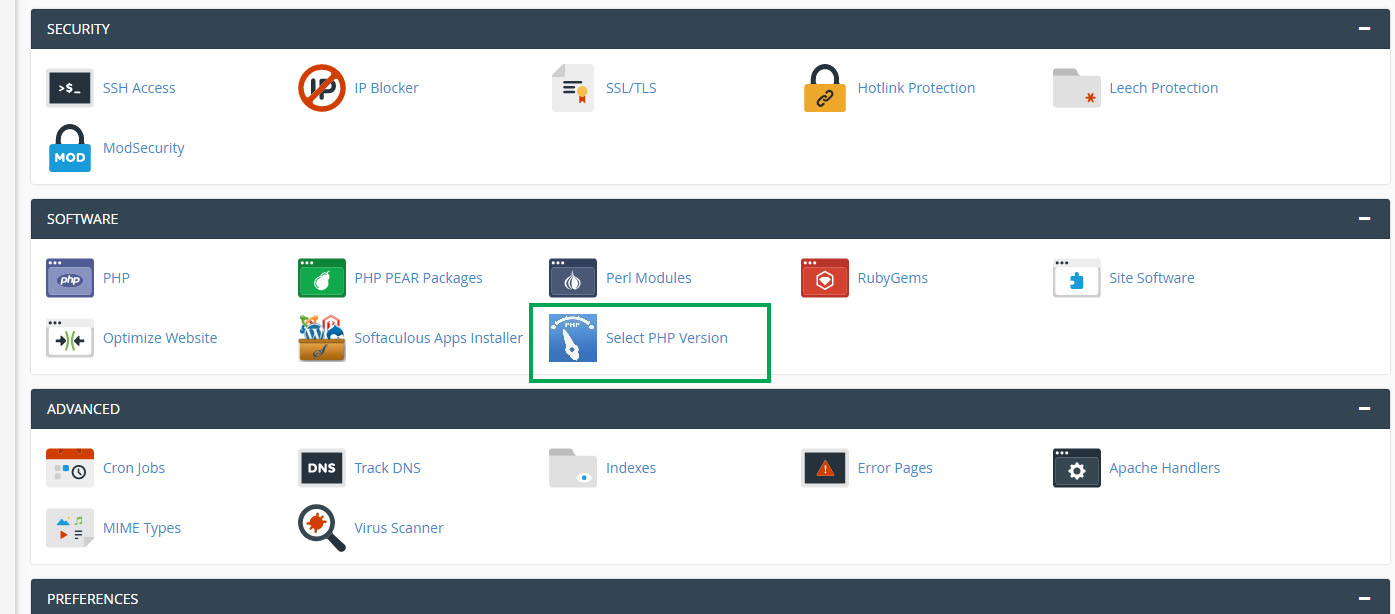
- Go to your Cpanel and click "Select PHP Version"
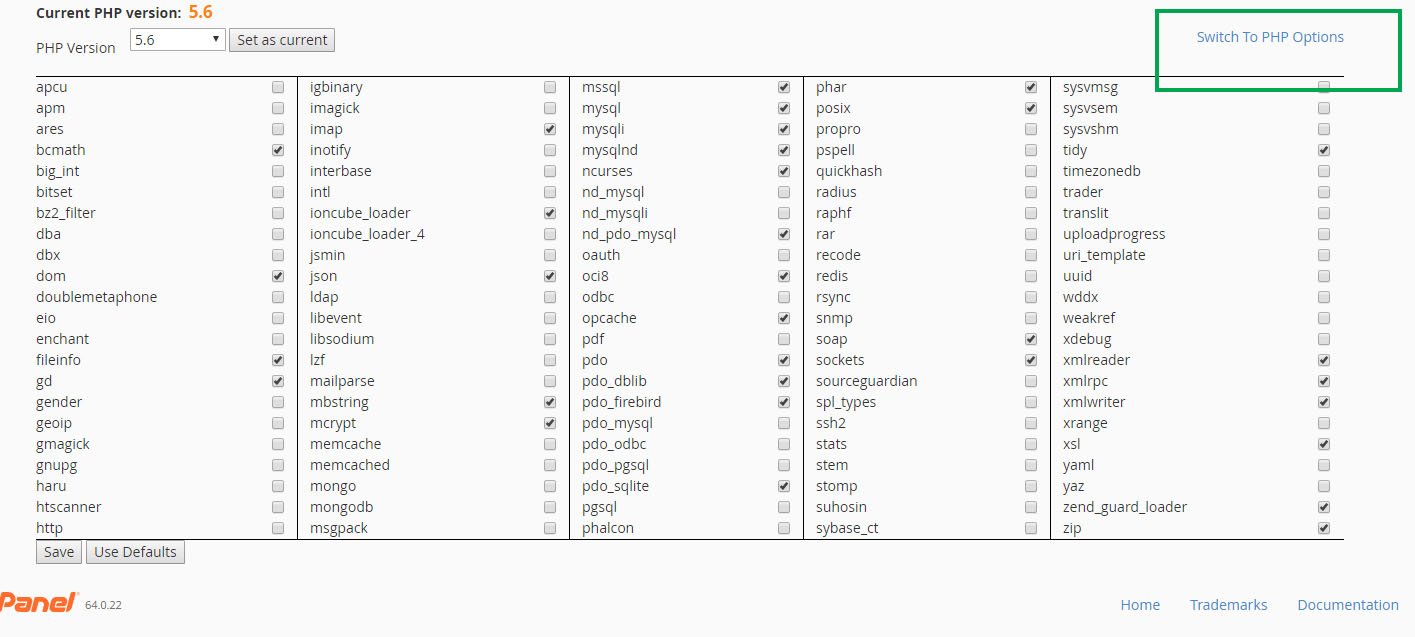
- Then click "Switch to PHP Options"
- Then set the values "upload_max_filesize", "post_max_size" and "memory_limit" as you see in the picture.
5) Quick Start - top
After installation, you will be redirected to home page.
Login with your Admin account email and password.
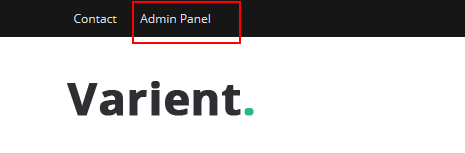
After login as Admin, you will see the "Admin Panel" link on the top menu. You can reach to the Admin Panel by clicking this link.
✓ Changing Admin Email Address: If you want to change Admin email address you should add a new user from register page.
Then you should go to "Users" section from navigation and change the user role of your new account as admin. Then you can login with your new account as Admin and you
can delete demo admin account from "Users" section.
But remember, if you added posts with demo admin account, this posts will not appear on your site after deleting demo admin account.
In this case, you can change the email address directly from phpMyAdmin without deleting this account.
✓ Changing Admin Password: After login the system you will see your user name in the top menu. Click your username and a dropdown will open then click
Change Password option. And fill in the form to change your password.
✓ Update Profile: Go to "Update Profile" section from navigation. You can update your profile informations here.
✓ Adding Category: Go to "Categories" section from navigation and click Categories. Then fill in the Add Category form and click Add Category button.
To add subcategory, Go to "Categories" section and click Subcategories. Then fill in the Add Subcategory form and click Add Subcategory button.
✓ Adding Post: To add a post you should first add a category. After adding some categories go to "Add Post" section from navigation and click Add Post, Add Video or Add Audio.
Then fill in the form and click Add Post button.
✓ Adding Page: Go to "Pages" section from navigation and click Add Page. Then fill in the form and click Add Page button. If you want to manage
existing pages: Go to "Pages" section from navigation and click Pages. Then you will see all pages in your site. You can make any change by selecting edit option for each page.
✓ Adding Widget: Go to "Widgets" section from navigation and click Add Widget. Then fill in the form and click Add Widget button. If you want to manage
existing widgets: Go to "Widgets" section from navigation and click Widgets. Then you will see all widgets in your site. You can make any change by selecting edit option for each widget.
✓ Adding Poll: Go to "Polls" section from navigation and click Add Poll. Then fill in the form and click Add Poll button.
✓ Adding Images to Gallery: To add images to gallery, first you should add some categories for images. Go to "Gallery" section from navigation and click Categories. Then fill in the Add Category form and click Add Category button.
After addings some categories, go to "Gallery" section and click Images. Then fill in the Add Image form and click Add Image button.
✓ Sending Email to Registered Emails (Newsletter): To use newsletter feature you should first make your email settings.
Go to "Settings" section from navigation and click Email Settings tab. Enter your mail server informations and click Save Changes button. Then go to "Newsletter" section from navigation and fill in the
Send Email to Registered Emails form and click the Send Mail button.
✓ Running Ads: If you want to add your ad codes to your website, this is very easy in the Varient.
Go to "Ad Spaces" section and add your ad codes then click Save Changes button.
✓ Managing Users: Go to "Users" section from navigation. You will see all users registered. You can select Change User Role, Delete User and Ban User options for each users.
✓ Adding Author: Varient is a multi-author system, so authors can add posts. To add an author to the system first user should register from register page.
Then Admin should go to "Users" section from navigation and should set user role as Author. After this process user will became an Author and he can reach his own Panel to manage his posts.
6) Admin Panel - top
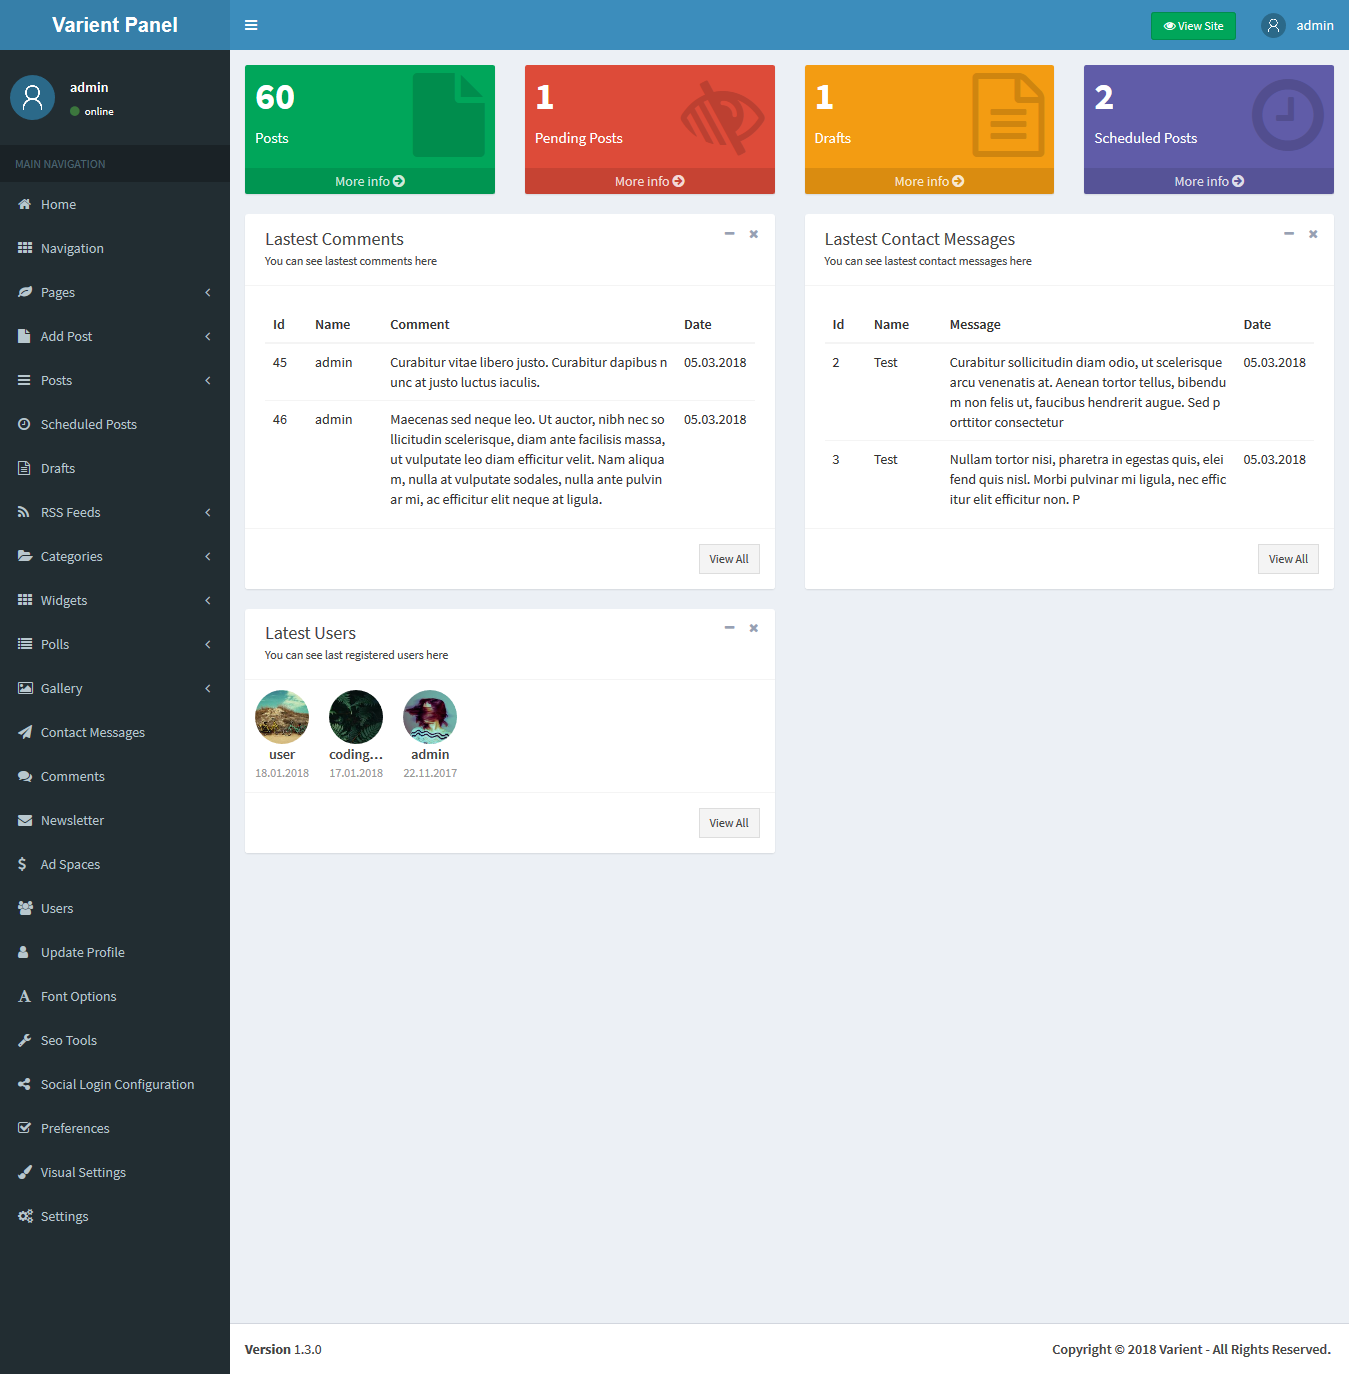
There are some counters in the Admin panel's home page. These counters:
- Posts: Shows Posts count
- Pending Posts: Shows Pending Posts count (Hidden post count)
- Drafts: Shows Drafts count
- Scheduled Posts: Shows Scheduled Posts count
7) Navigation - top
Add Menu Link: You can add a new link to the navigation from this form. Also you can add a dropdown link to the navigation by selecting "Parent Link".
Navigation: You can see links on your navigation on this table and you can update or delete a link.
Menu Limit: You can set menu item count that will be appear on your navigation from this form.
8) Pages - top
You can add, update and delete pages from this section.
Add Page: Go to "Pages" section from navigation and click Add Page. Then fill in the form.
- Title: Your page title.
- Slug: Slug for SEO friendly url. If your page title consists of special characters your title slug will not be generated. In this case you should add custom slug.
- Description: You can add Description (Meta Tag) for page.
- Keywords: You can add Keywords (Meta Tag) for page.
- Parent Link: You can select parent link.
- Menu Order: Your pages will order according to this value.
- Location: You can select your page link location.
- Visibility: You can hide or show your page.
- Show Page Only to Registered Users: If you want to show page only to registered users you should select yes.
- Show Title: You can hide or show your page title.
- Show Breadcrumb: You can hide or show your page breadcrumb.
- Show Right Column: You can hide or show sidebar on your page.
- Content: Your page content. You can add image and video with text editor.
Delete Page: On the same list you can delete pages by selecting "Delete" option for each pages.
9) Posts - top
You can add, update or delete posts from this section.
Add Post: Go to "Add Post" section from navigation and click Add Post, Add Video or Add Audio. Then fill in the form.
- Title: Your post title.
- Title Slug: Slug for SEO friendly url. If your page title consists of special characters your title slug will not be generated. In this case you should add custom slug.
- Keywords: You can add Keywords (Meta Tag) for post.
- Summary: You can add short description about post.
- Category: You should select a category for post.
- Subcategory: You can select a subcategory for post.
- Post Visibility: You can hide or show your post.
- Add to Featured Posts: You can add your post to the featured posts.
- Add to Breaking News: You can add your post to the breaking news (newsticker).
- Add to Slider: You can add your post to the index slider.
- Add to Recommended Posts: You can add your post to the recommended posts.
- Show Only to Registered Users: If you want to show post only to the registered users you can select this option.
- Scheduled Post: From here you can select a future date for your posts. Your posts will be automatically published when the date you select is reached.
- Tags: Tags for post.
- Optional Url: If you enter a url here there will be a button in your post page to access this url.
- Main Image: Image for post.
- Additional Images: If you want to add more than one image to the posts you can select multiple images from here.
- Content: Post content. You can add image and video with text editor.
Delete Post: On the same list you can delete posts by selecting "Delete" option for each posts.
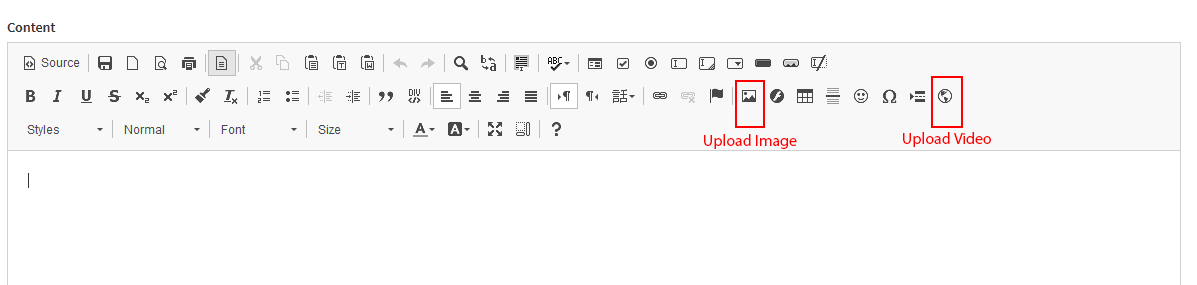
Upload Image: To add image to post content click image upload button on the text editor. Then select your image and press the Send to server button.
Upload Video: To add video to post content click video upload button on the text editor. Then paste your video embed code.
Post Lists:
- Posts: You can see all posts on this page.
- Featured Posts: You can see featured posts on this page. (These will be shown on index in the 4 small box)
- Featured Slider Posts: You can see index slider posts on this page. If you want to change the order of posts in the slider, you can update Slider Order values of posts as you want.
- Breaking News: You can see news ticker posts on this page.
- Recommended Posts: You can see recommended posts on this page.
- Pending Posts: You can see pending posts on this page. (These posts waiting for Admin approval or hidden posts)
10) Scheduled Posts - top
You can see your scheduled posts from this section.
Your post will be automatically published when the date you select is reached.
If you want to publish immediately, you can click "Publish" option.
11) Drafts - top
Posts can be saved as a draft instead of publishing directly. You can see your drafts in this section.
12) RSS Feeds - top
You can add, update and delete RSS Feeds from this section.
Import RSS Feed: Go to "RSS Feeds" section from navigation and click Import RSS Feed. Then fill in the form.
- Feed Name: Feed name.
- Feed URL: You should enter a valid RSS Feed URL to this field.
- Number of Posts to Import: You can define posts count that you want to add your site.
- Category: Posts will be added to category that you selected.
- Subcategory: Posts will be added to subcategory that you selected.
- Auto Update: You can select this option if you want to update with Cron Job.
- Show Read More Button: You can hide or show Read More button with this option.
- Location: You can select your page link location.
- Read More Button Text: You can add a text for the Read More button.
- Image : You can add an image for your posts.
Delete Feed: On the same list you can delete RSS feeds by selecting "Delete" option for each RSS feeds.
Add Posts with Cron Jobs
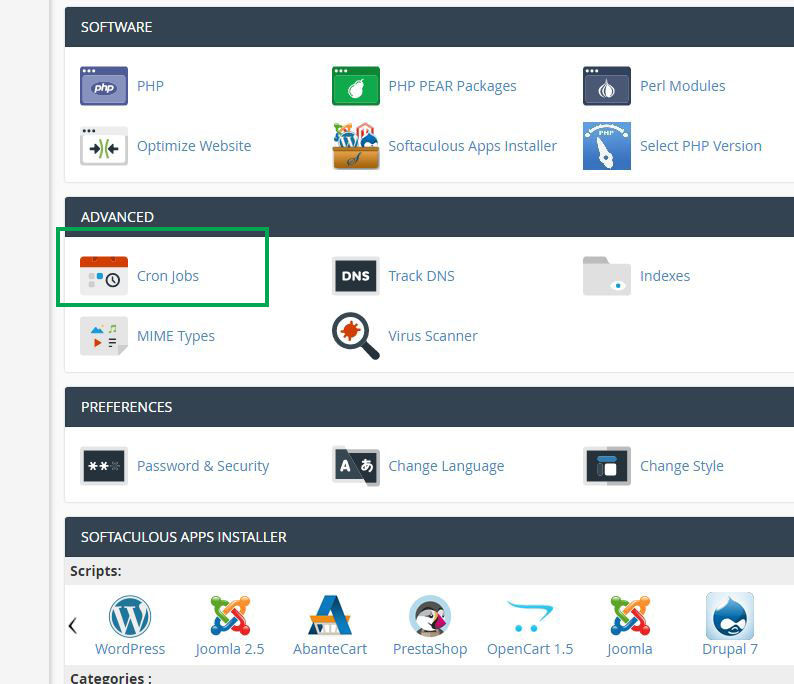
You can set a cron job to update your posts with RSS feed sources. Follow the steps:Step 1: Go to your Cpanel and click cron jobs.
Step 2: Add new cron job.
Select an option.
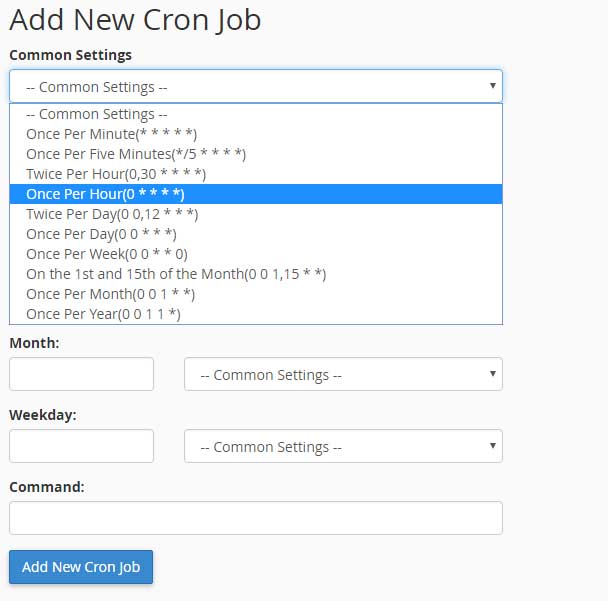
Then paste this command to command line:
wget -O /dev/null http://yourdomain.com/cron/check_feed_posts

Then click Add New Cron Job button. Once you have done this, posts automatically will be added, if you select auto update option for a RSS feed.
13) Categories - top
You can add, update or delete categories from this section.
Add Category: Go to "Categories" section from navigation and click Categories. Then fill in the Add Category form.
- Category Name: Category name.
- Category Slug : Slug for SEO friendly url. If your category name consists of special characters your slug will not be generated. In this case you should add custom slug.
- Category Description: You can add Description (Meta Tag) for category.
- Category Keywords: You can add Keywords (Meta Tag) for category.
- Category Color: You should select a color for category. This color will be used for your category block color and category label color.
- Menu Order: Your categories will be listed according to this order.
- Show on Menu: You can show or hide your categories on the menu.
- Show at Homepage: You can show or hide your categories at Homepage.
- Category Block Style: You should select a block style for category.
Delete Category: On the same list you can delete categories by selecting "Delete" option for each categories.
Subcategories: You can add, update or delete subcategories from this section.
Add Subcategory: Go to "Categories" section from navigation and click Subcategories. Then fill in the Add Subcategory form.
- Category Name: Category name.
- Category Slug : Slug for SEO friendly url. If your category name consists of special characters your slug will not be generated. In this case you should add custom slug.
- Category Description: You can add Description (Meta Tag) for category.
- Category Keywords: You can add Keywords (Meta Tag) for category.
- Parent Category: You should select a top (parent) category.
Delete Subcategory: On the same list you can delete categories by selecting "Delete" option for each categories.
14) Widgets - top
You can add, delete or update sidebar widgets from this section.
Add Widget: Go to "Widgets" section from navigation and click Add Widget. Then fill in the form.
- Widget Title: Widget title.
- Widget Order: Widgets will be listed according to this order.
- Widget Visibility: You can hide or show a widget.
- Content: Widget content.
Delete Widget: On the same list you can delete widgets by selecting "Delete" option for each widgets.
15) Polls - top
Varient has poll feature. You can add unlimited polls and you can manage these polls from this section.
Add Poll: Go to "Polls" section from navigation and click Add Poll. Then fill in the form.
- Question: Poll question.
- Options: Options for your question.
- Status: You can enabled or disabled a poll.
- Vote Permission : You can prevent non-registered users from voting.
Delete Poll: On the same list you can delete poll by selecting "Delete" option for each polls.
16) Gallery - top
You can add, delete or update images to gallery from this section.
Before adding new image you should add categories for gallery.
Add Category: Go to "Gallery" section from navigation and click Categories. Then fill in the Add Category form.
Update Category: Go to "Gallery" section from navigation and click Categories. On the category list you can make changes
on categories by selecting "Edit" option for each categories.
Delete Category: On the same list you can delete category by selecting "Delete" option for each categories.
Add Image: Go to "Gallery" section from navigation and click Images. Then fill in the Add Image form.
Update Image: Go to "Gallery" section from navigation and click Images. On the image list you can make changes
on images by selecting "Edit" option for each images.
Delete Image: On the same list you can delete image by selecting "Delete" option for each images.
17) Contact Messages - top
You can see messages that users sent from the contact form on the site from this section.
If you want to delete a message from list, click the Select an option button and click delete.
18) Comments - top
You can see comments made by users from this section.
If you want to delete a comment, click the Select an option button and click delete.
19) Newsletter - top
The Newsletter allows you to share some updates and interesting things with the users.
You can see the all registered emails and you can send an email to these emails from this section.
If you want to delete an email, click the Select an option button and click delete.
20) Ad Spaces - top
You can manage your ad codes from this section.
Because of ad spaces are responsive, you need to enter the code at different metrics for each ad.
If you do not have an ad code, you can create your own ad code by uploading an image and entering a link for the ad.
21) Users - top
You can manage registered users from this section. Go to "Users" section from navigation.
Options:
- Change User Role: If you want to change user role you can use "Change User Role" option.
- Ban User: If you want to ban a user you can use "Ban User" option.
- Edit: You can edit a user by selecting edit option.
- Delete: You can delete a user by selecting delete option.
There are 3 roles in the system:
Admin: System administrator.
Author: Authors can add, update and delete their posts. Authors can
only see and process their own posts. If a post added or edited by an author, Admin approval is required.
If Admin approves, the post will be published.
User: User can't access the Admin panel and they can't add posts.
22) Update Profile - top
Varient is a multi-author system, so every author have their profile page. Admin and author can update their profiles from this section. Go to "Update Profile" section from navigation.
- Username: Your name that will be displayed.
- Name Slug: This slug will be used for accessing author profile page.
- About Me: Authors can add explanation about themselves.
- Social Accounts: Authors can add their social accounts links.
23) Font Options - top
Varient has Google Fonts options. You can change site fonts from this section. Go to "Fonts Options" section from navigation.
24) Seo Tools - top
Go to "Seo Tools" section from navigation.
- Site Title: Site title.
- Home Title: Homepage title.
- Site Description: Site description
- Keywords: Site keywords
- Google Analytics: You can add your Google Analytics code from here.
25) Social Login Configuration - top
Go to "Social Login Configuration" section from navigation.
To use Facebook login and Google login on your site you should create an app and enter app id and app secret
from this form.
Facebook Login:
- Go to https://developers.facebook.com/
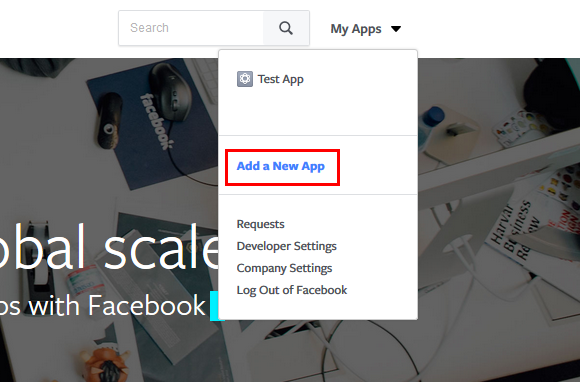
- Click Add a New App
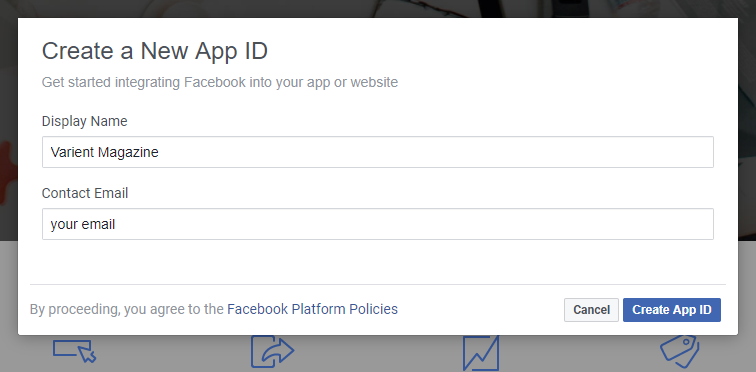
- Fill in the form then click Create App ID
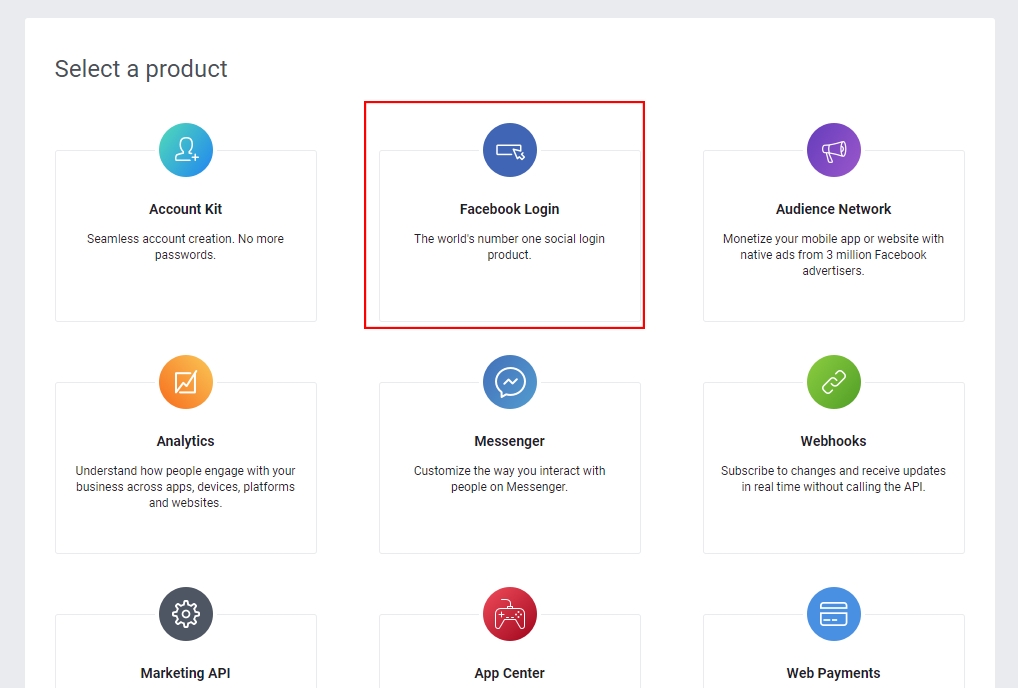
- Then select Facebook Login with clicking Set Up from Select a product section.
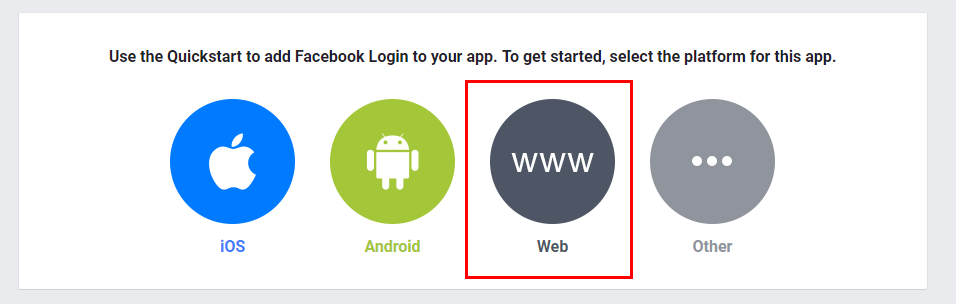
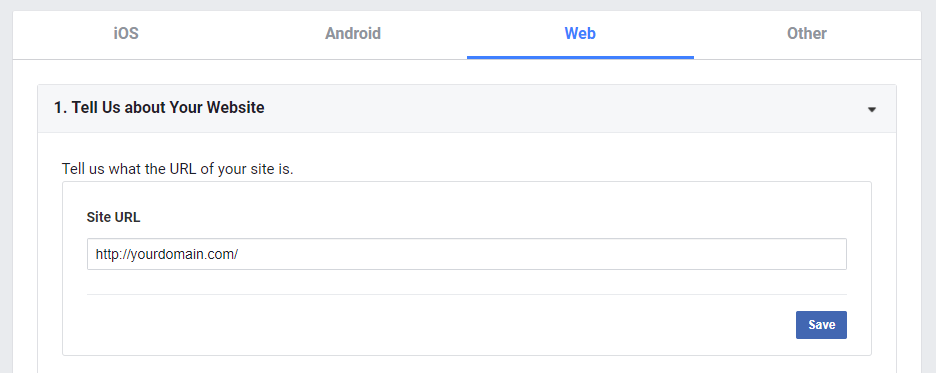
- Select web as platform.
- Enter your site url and click save.
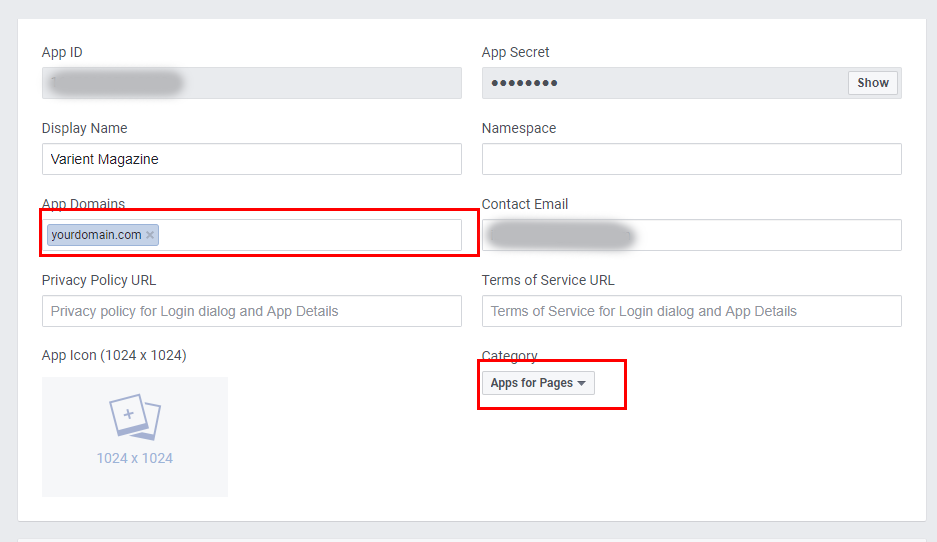
- Then click Settings from left navigation. Enter your App Domains and select your category. Click Save Changes.
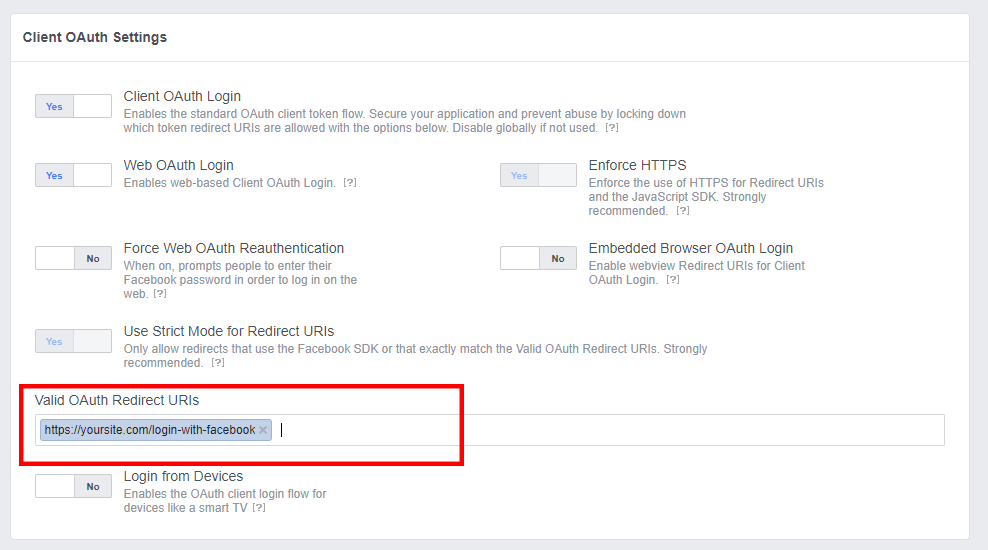
- Then click Facebook Login from left navigation. Enter your this link "https://yoursite.com/login-with-facebook" to Valid OAuth redirect URIs field. Click Save Changes.
- Then click App Review from left navigation. And make your app public.
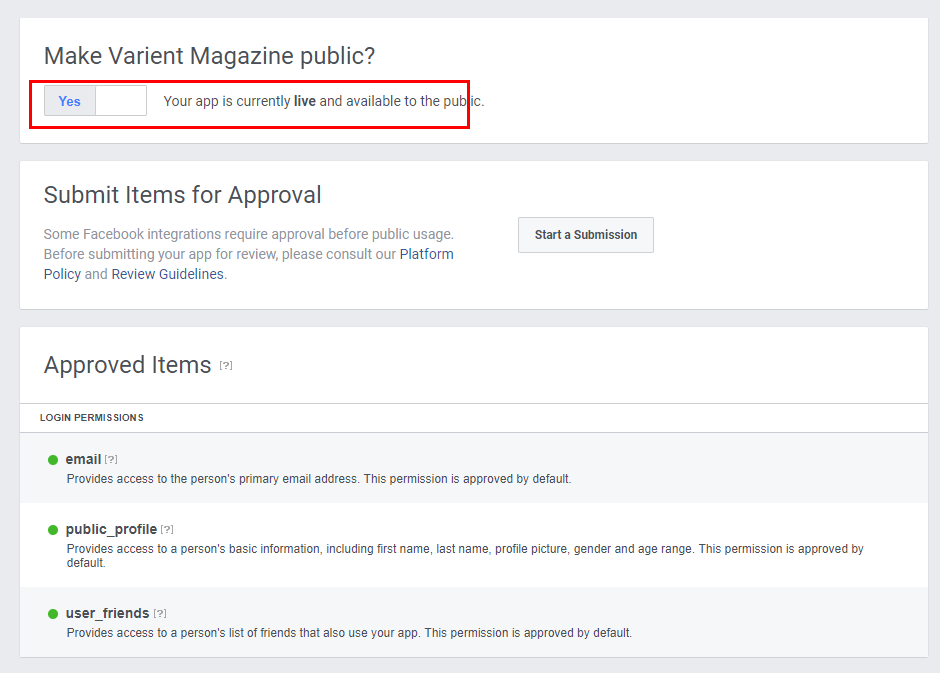
- Your app is ready. Go to dashboard and get your App ID and App Secret.
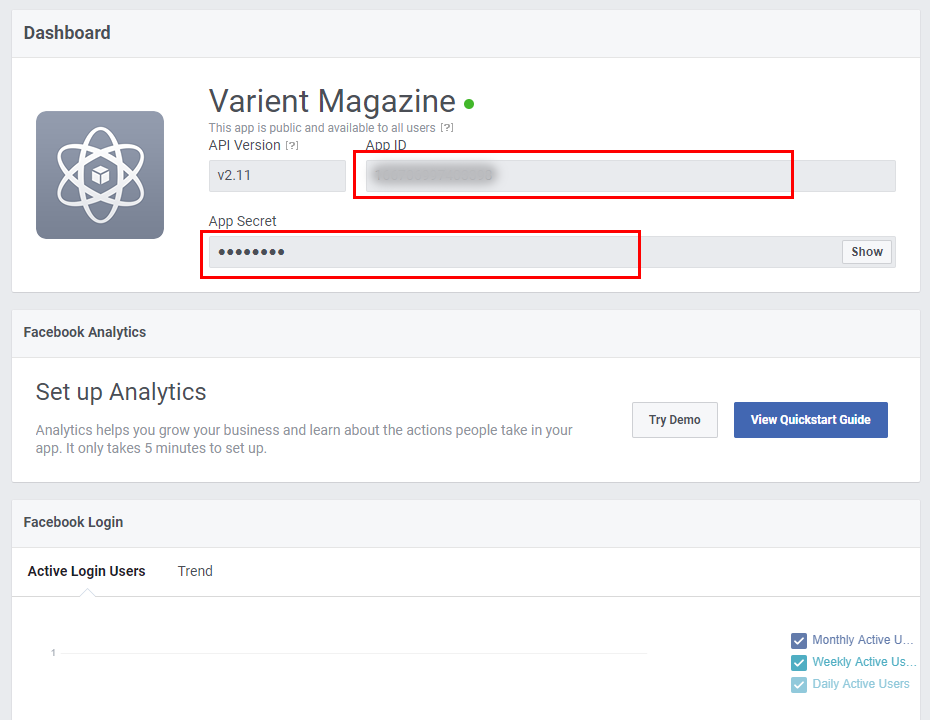
Google Login:
- Go to https://console.developers.google.com/
- Click Enable APIs and Services
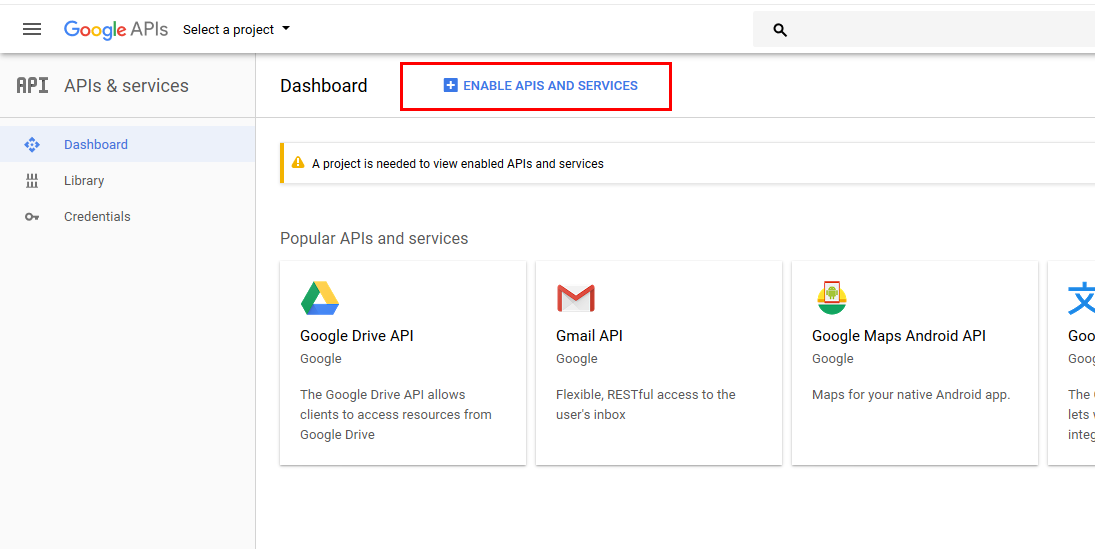
- Select Google+ API
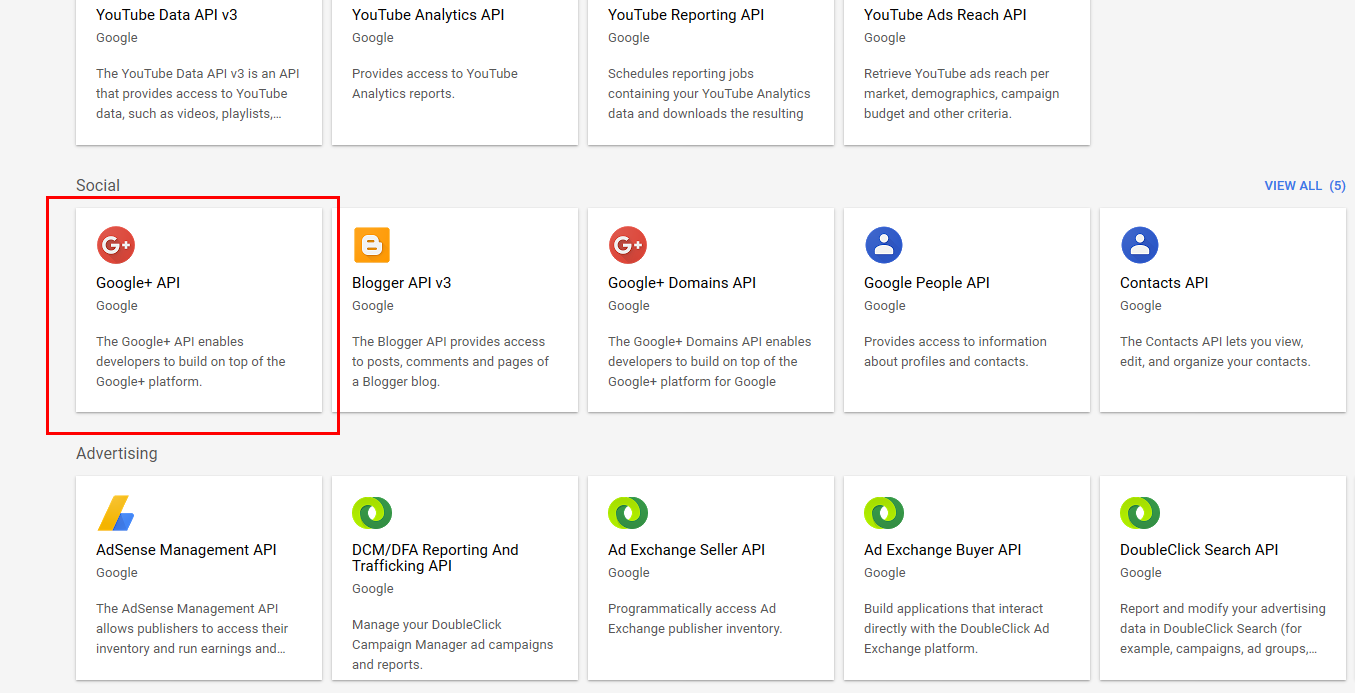
- Click Enabled Button
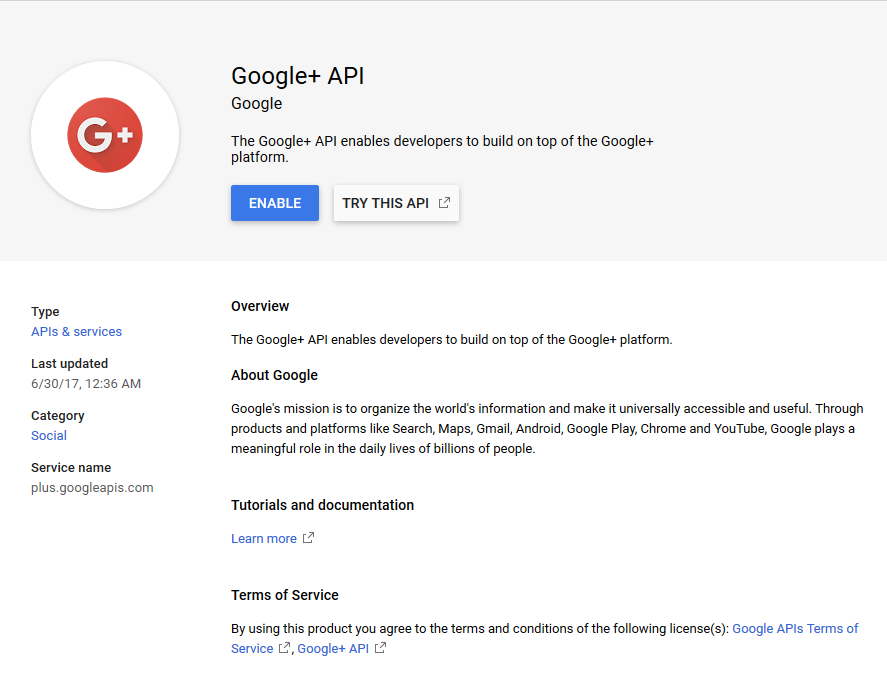
- Then you will see a window "To view this page, select a project" click Create.
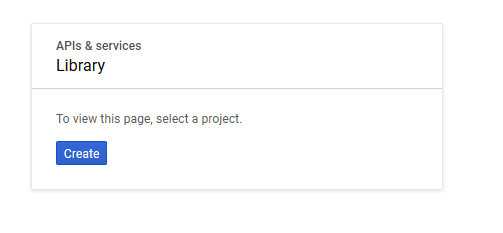
And After that enter a name for your project and click Create.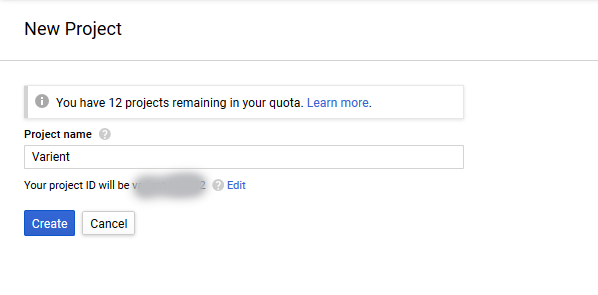
After this step if you see Enable button again Click Enable. Then your API will be created. - Click Credentials from left navigation. Then click Create Credentials and select OAuth Client ID option.
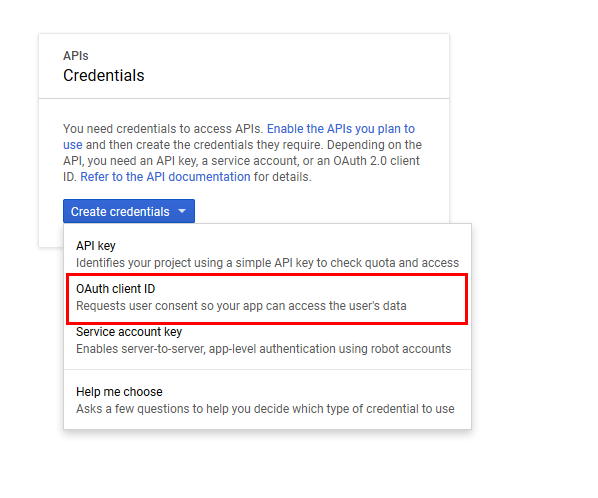
- Fill in the form and click Save.
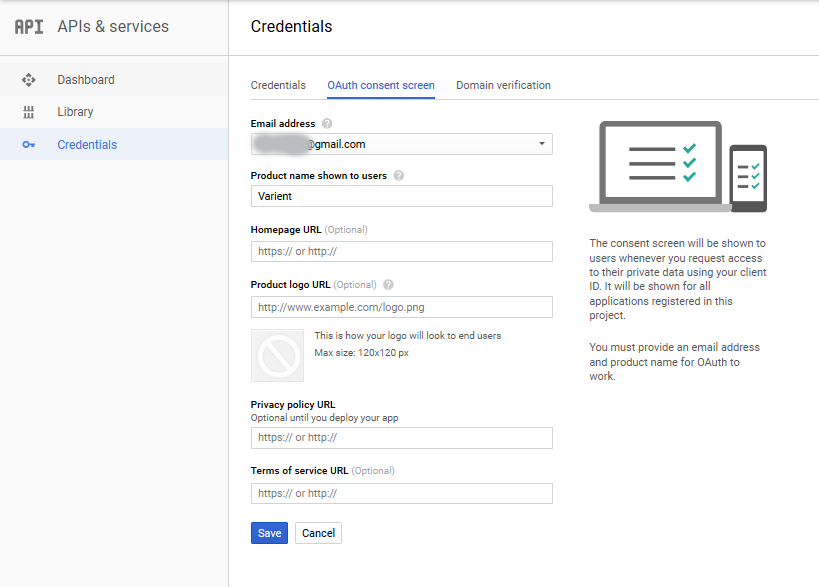
- Then select Web Application and enter your url. "http://yourdomain.com/login-with-google" click Create button.
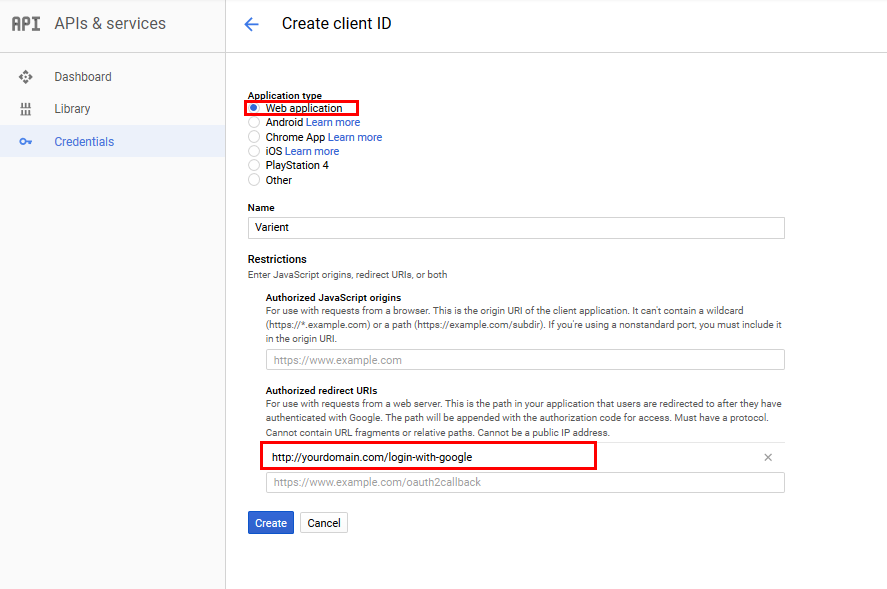
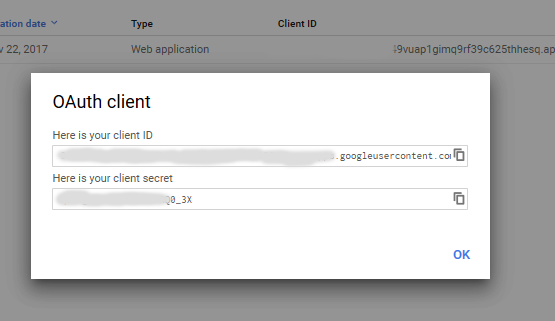
- Then your API will be ready and you will see your client ID and client secret.
26) Preferences - top
From this section,You can make adjustments to manage your site better.
- Registration System: Your can enable or disable registration system in your site.
- Comment System: Your can enable or disable comment system in your site.
- Facebook Comments: Your can enable or disable Facebook comments in your site.
- RSS: Your can enable or disable RSS in your site.
- Show Featured Section: Your can show or hide featured section in your site.
- Show Latest Posts on Homepage: Your can show or hide latest posts on your homepage.
- Show News Ticker: Your can show or hide news ticker.
- Show Post Author: Your can show or hide post author.
- Show Post Date: Your can show or hide post date.
- Show Post View Count: Your can show or hide post page view count.
27) Forgot Password - top
If you forgot your password you can reset your password by clicking "Forgot password?" on login screen. Then your new password will be sent to your email.
To get password email you need to make your mail settings first. For this go to "Settings" section and click "Email Settings" tab and add your mail server informations.
28) Visual Settings - top
You can make your visual settings from this section.
Go to "Visual Settings" section from navigation.

- Site Color: General site color
- Top Header and Block Heads Color: Header and block background colors
- Post Item Block Style: If you select first option, your posts will be listed vertically. If you select second option, your posts will be listed horizontally.
- Logo: You can change your logo from here.
- Logo Footer: You can change your footer logo from here.
- Favicon: You can change your favicon from here.
29) Settings - top
Genaral Settings: Go to "Settings" section from navigation.
- Language: Site language. Default English.
- Application Name: Your site name.
- Footer About Section: About your site. This will be shown in the footer.
- Post Optional Url Button Name: You can set a new name for your optional button.
- Copyright: You can update copyright section from here.
- Menu Limit: From here you can specify the number of items you want to appear in your menu.
- Number of Posts Per Page (Pagination): The number of posts to list on each page.
Email Settings:
You can make your email settings from this section.
Go to "Settings" section from navigation.
- Mail Protocol: Your mail protocol (SMTP or Mail). Default SMTP. But some mail servers use Mail protocol. In this case you should set this value to Mail.
- Mail Title: Your email title
- Mail Host: Your mail server (Exp: mail.example.com)
- Mail Port: Your mail port (Default: 587)
- Mail Username: Your username (Exp: mail@example.com)
- Mail Password: Your password
Contact Settings:
Go to "Settings" section from navigation and click "Contact Settings" tab.
- Address: Your address
- Email Address: Your email address
- Phone Number: Your phone number
- Google Map API Key: The API key needed to run the map.
- Google Map Latitude and Google Map Longitude: Your location
- Contact Text: You can add some text about contact.
Once you have received this key, you can activate your map by entering your latitude and longitude information from this section.
Google Map API:
- Go to https://console.developers.google.com/
- Click Enable APIs and Services
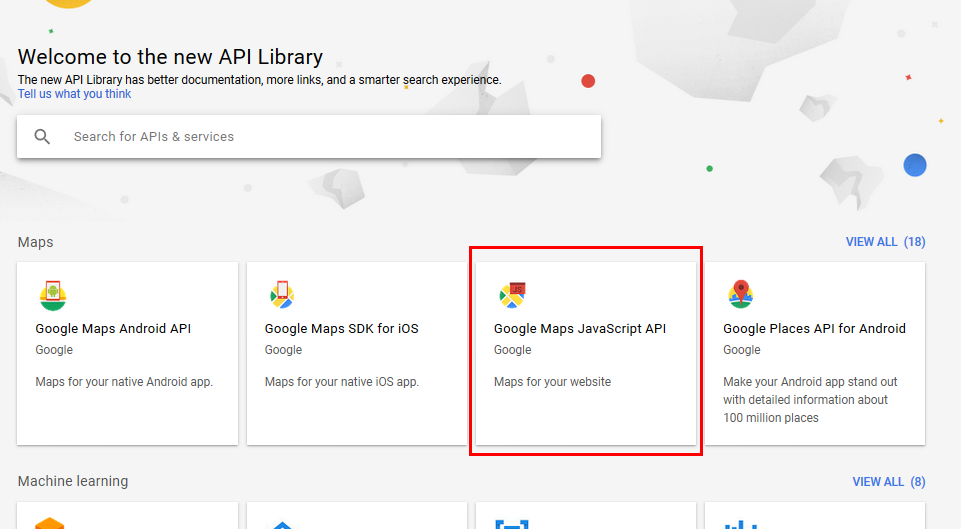
- Select Google Maps JavaScript API
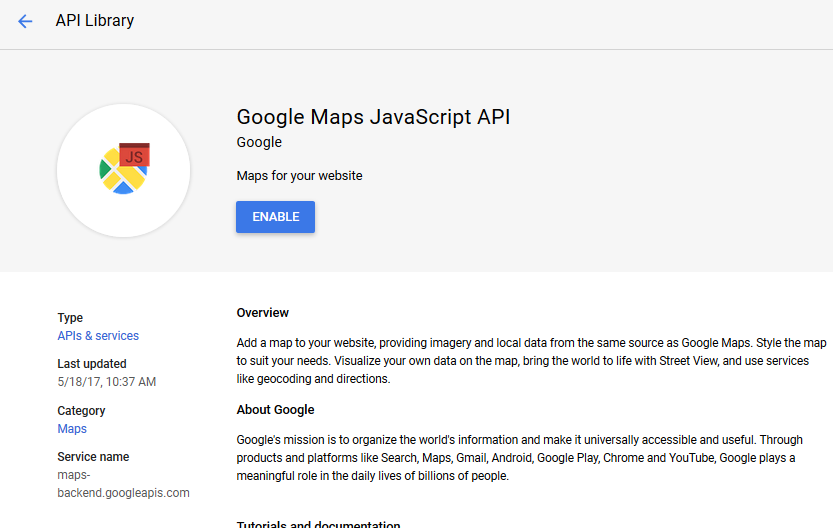
- Click Enabled Button
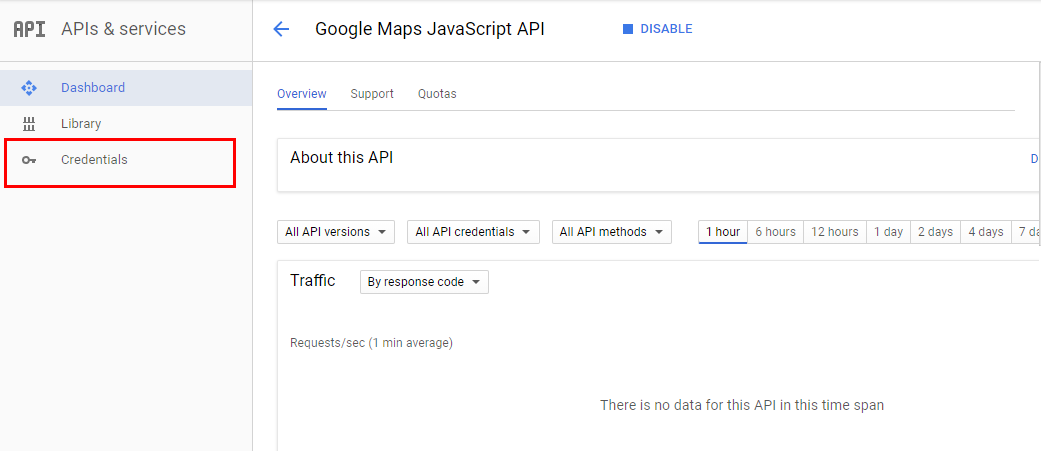
- Click Credentials from left navigation.
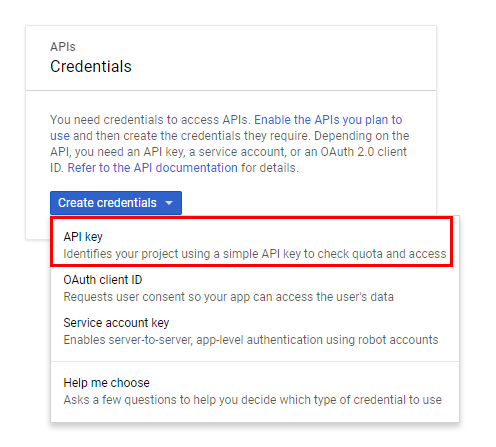
- Click Create Credentials and Select API key option.
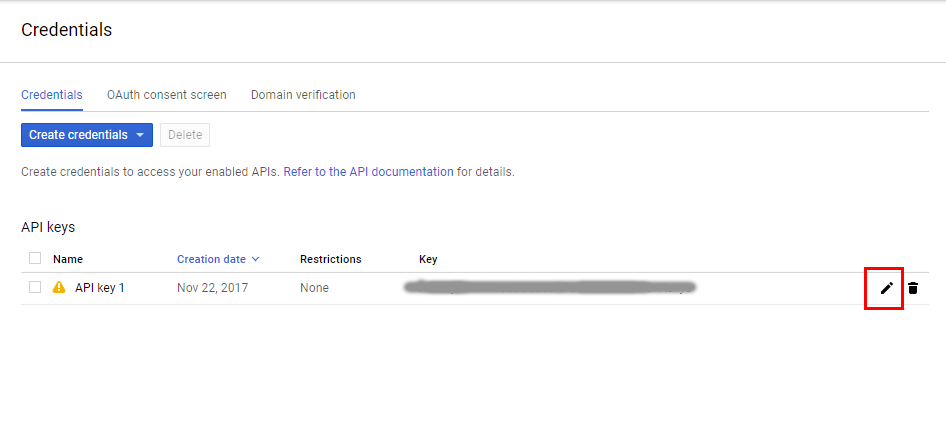
- Click Edit from Credentials list.
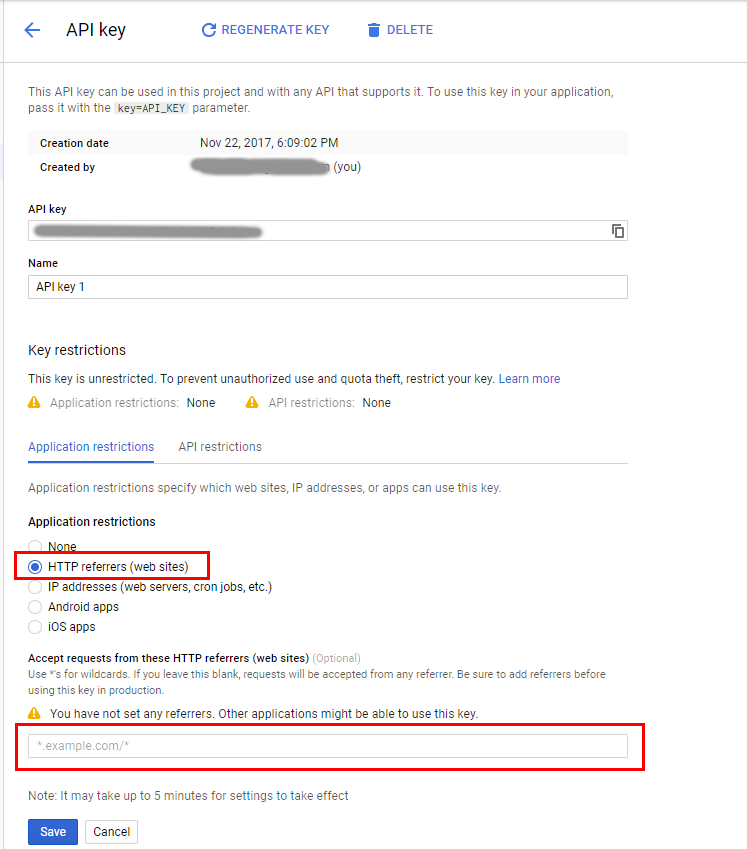
- Select HTTP referrers (web sites) option and add your site url. Than you can use your API key.
Social Media Settings: Go to "Settings" section from navigation and click "Social Media Settings" tab.
You can add your social media accounts from this section.
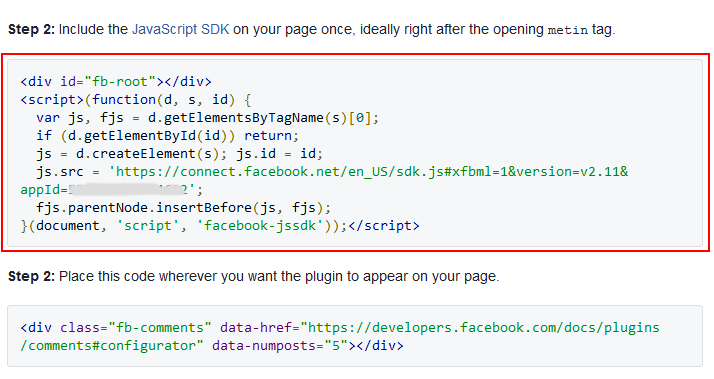
Facebook Comments:
If you want to use Facebook comment plugin you should add your plugin code to this section.
How to Get This Code:
- Go to https://developers.facebook.com and click Add a new app.
- Click Settings and then click +Add platform.
- Select website and enter your site url and click save changes.
- Then go to https://developers.facebook.com/docs/plugins/comments/ and click Get Code button.
- Then copy this code and paste to Facebook Comments field.
You can add your custom HTML, CSS, JavaScript codes from this section. Your codes will be placed in head tags.
30) Author Panel - top
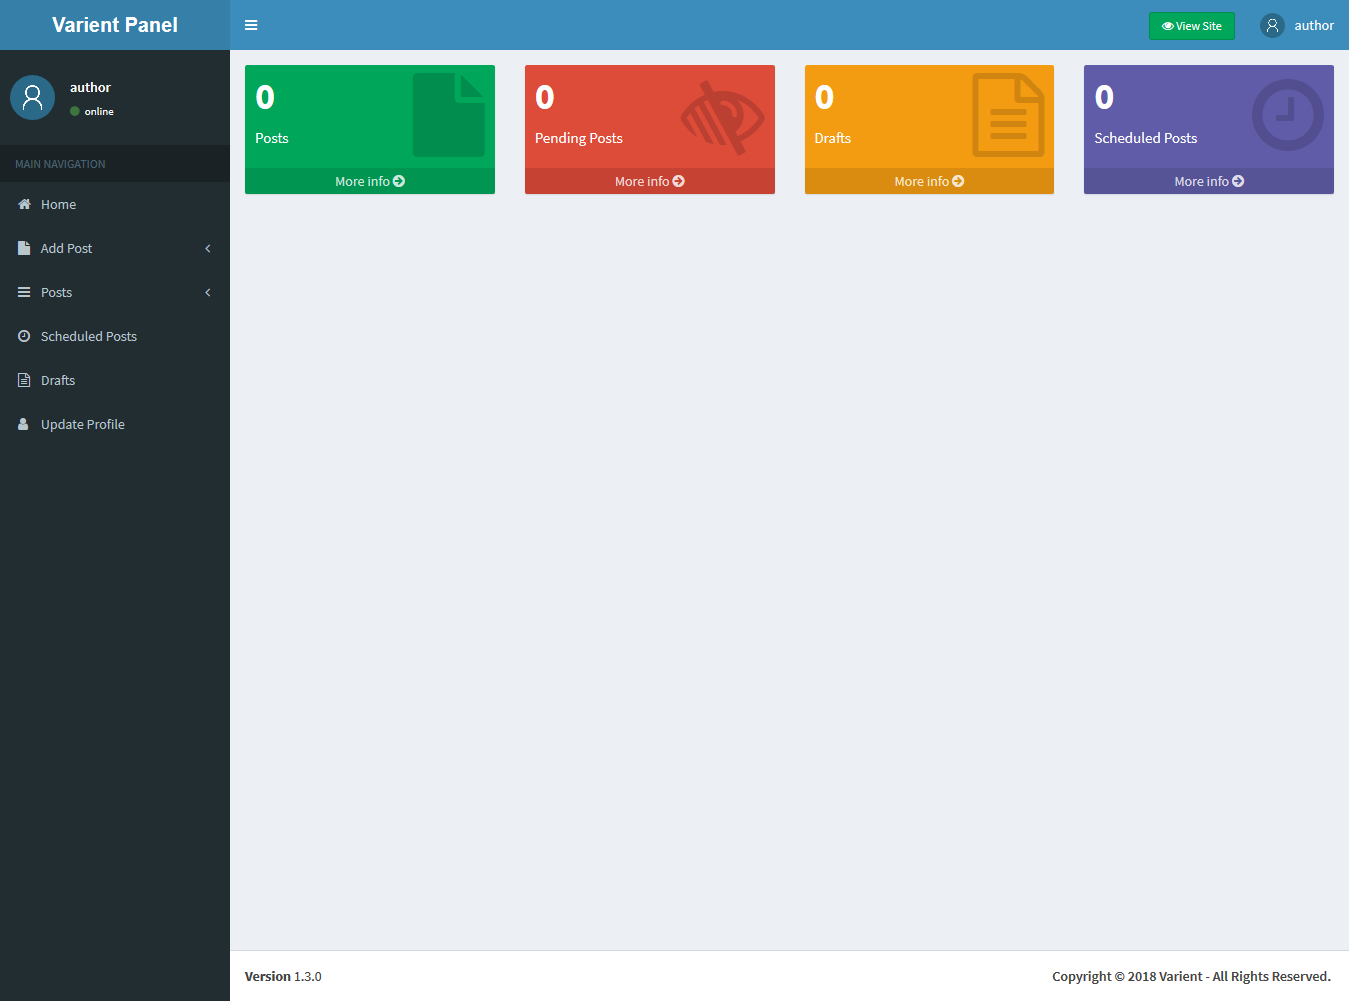
Varient is a multi-author system. Every author has their own panel and they can manage their posts. If author add or update a post it will needs Admin approval.
The post will not be published on the site until Admin approve it.
Posts: Authors can add, delete, and edit their posts from this section. After adding a post it will be added to Pending Posts
and it will wait for Admin approval.
Scheduled Entries: Authors can see their scheduled entries from this section.
Update Profile: Authors can update their profile from here.
Once again, thank you for purchasing this script. As I said at the beginning, I'd be glad to help you if you have any questions relating to this script. I'll do my best to assist.
Codingest